Here are the parts you need, with a full description below. I don’t have an Amazon affiliate account anymore, so please shop around, the links are only for reference. The geophone manufacturer (RT Clarke) is what I use here in the US, as they ship small geophone quantities to individuals.
- One Raspberry Pi. I recommend the Raspberry 3 B Plus over the Raspberry 4, as the enhanced video features of the Raspberry 4 are not needed for the seismometer application, while the Raspberry 3B+ has about 20% lower power consumption and is cheaper than the Raspberry 4.
- The Waveshare High precision AD / AC board board for Raspberry.
- Geophones. At least 1 vertical, optionally 2 horizontal geophones. For seismic I use 10Hz phones, which are also the cheapest ($30): 1 Vertical and optionally 2 Horizontal components. For seismology I recommend geophones with a lower frequency, like 4.5Hz: 1 Vertical and 2 Horizontal components. You can order from RT Clark in Oklahoma, or you may try your luck and find equivalent products on Aliexpress. The RT geophones come with their shunt resistor already soldered. If you get your geophones from other sources, read the doc and get matching shunt resistors (probably something close to 395 Ohms).
- Stranded wire, 20 gauge, ideally red and black. 18 gauge (which is a bigger wire than 20, that’s how gauge works) will barely fit in the AD bus. 22 gauge is too small.
Install process:
- Download and install Balena Etcher, or an equivalent. This assume you are using a Windows PC.
- Download this Seisberry Image (Raspbian Buster with various libraries installed, and compiled code, about 8G). The latest version, dated August 24 2020 is called “Cotopaxi”. It has GPS support and various enhancements, as well as a GUI. You may find older/experimental versions in this directory, which should not be used: stay with “Cotopaxi”.
- With Etcher, burn the Seisberry image to your SD card (needs to be a 16G SD minimum). The distribution should expand to your card size on install. Put the card in the Raspberry internal bay.
- Either plug a screen + keyboard + mouse to the Pi OR download and install VNC viewer on your PC and connect the Pi to you network with a network cable. Then in VNC viewer log to the host “seisberry16Hz”, user: pi, password: seisberry. If you do not have a proper DHCP server on your network (rare now) you may have to plug a screen to the Pi once, type ifconfig in a terminal, and write down the Pi’s IP. Then use that IP in VNC viewer for the Host name.
- On the Pi: immediately change the password in Start>Raspberry Pi configuration.
- Optional: update your Operating system. This may take a while. Open a terminal and type:
sudo apt update
sudo apt full-upgrade- Shut down the Pi when done.
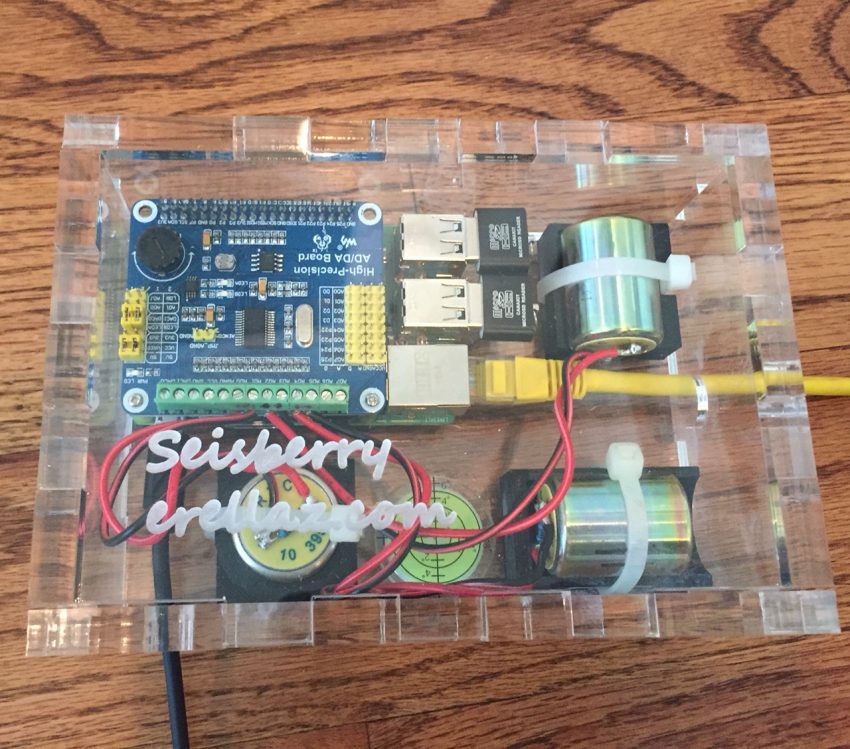
- Set the jumpers on your AD board as in the picture.
- Connect the board to the GPIO of the Raspberry, and put the 2 screws and spacers coming with the board.
- Solder the wires to the geophones. I use about 6 inches of wire. Geophones are polarized, so the red goes on the + and the black on the -.
- Connect the geophones to the board, as in the picture (G1 is the vertical component).

- Power up the Pi.
- If your external card is not called 32G, you need to edit the following text file: ~/Desktop/DIYSeis/C/param, and change the target of the script accordingly.
- On the Cotopaxi distribution, crontab is setup so the seismic recorder and the Gui will autostart at boot. The GUI allows you to stop or start the seismic recorder at will, get the status (it will look if the process is running and return the PID if it is), as well as read the parameter file.

- If you are more a command line kind of guy (or gale), close the GUI and experiment with those commands in a bash terminal:
cd ~/Desktop/DIYSeis/C
./ads1256_test param
ps -eaf | grep ads
cd ~/Desktop/GUI
python3 SeismographGUI.py &
crontab -e
The Seisberry is expecting 1 memory card plugged in a USB port, and called 32G. The card could be FAT32, formatted in your PC, however I would highly recommend to make them ext4, which corrupts less if the Raspberry Pi loses power without a proper shut down (if it happens just reformat the card, and take the opportunity to make them ext4, as discussed in the FAQs).
Next, to configure your daily seismic processing scripts, visit the following directory :
cd ~/Desktop/Daily/Look at the python scripts in this directory. The user defined constants are at the very beginning of each script, clearly commented. You can customize those parameters to fit your needs. At the very least adjust the latitude and longitude of your station, for the automatic annotation of the local events to be relevant. Those scripts are run every morning, scheduled via crontab. If you are curious to see the scheduler settings (optional), type:
crontab -eThe scripts above read your daily recording and generate a nice web page showcasing the seismograms. They also create miniseeds, and regularly cleanup the previous days of production, so you do not run out of space on your card. This also means if you recorded a nice seismic event, you have only about 2-3 days to copy it somewhere else, as after that time it will be automatically deleted. After the Seisberry has been running for at least 24 hours, any computer on your local network should be able to see and display the seismic results. In a web browser on the seisberry or any machine on your network, just click on the following link:
The pre-configured Apache 2 web server running on the Seisberry will then generate a webpage with the seismic recording.
The last (optional) thing would be to calibrate your Seisberry.
Congratulation, you are done!
What is next?
- Maybe have a look at the full doc.
- Or maybe build an acrylic box. I propose a design is here, ready to sent to Ponoko to laser cut using 9mm thick material. Just make sure the contours are set to “cut” and the text is set to “engrave”.
- Read the seisberry FAQs.
- Configure a DynDNS so your Seisberry is accessible from anywhere in the world.
- Set up an Iris Server to share your results with the scientific community at large.
- Contribute to the code on Github.
- Leave a comment in the FAQs section.
- and… have fun. Open a ticket on Github (with specifics) if you run into insurmountable difficulties.
Thanks!